

The purpose of this write-up is to provide a ‘how to’ for replacing your thermostat assembly should the same thing occur to your RRS as mine did – as seen here; http://www.rangerovers.net/forum/9-...ge-rover-sport-l320/81761-2006-sport-overheated-reduced-engine-performance.html. Depending on your skill level this should take between 2-4 hours. The most difficult challenge I encountered during the process was the removal of the two screws on the lower half of the assembly which are in extremely tight areas – YMMV.
Note:
I performed this install while my cooling system was completely drained. If performing this procedure while coolant is still in the system, you may experience some fluid release when disconnecting some of the hoses. It is recommended if you are refilling, that you check for any leaks with a vacuum seal. Also, if you're performing this repair consider the following thread as a preventive measure in keeping your RRS running smooth; http://www.rangerovers.net/forum/9-range-rover-sport-l320/48031-2-hour-tune-up-4-4-hse.html
Credits:
RoverGuy7
Gooseyloosey
Tools Required
¼” Ratchet – thin profile for confined areas and preferably one with a swivel head or equivalent)
6mm socket – Used for engine cover removal
8mm socket – All bolts encountered
T25 Torx – PCV screws
T30 Torx – thermostat assembly screws
Phillips & Flat head screwdriver
Pliers – for hose removal clips
Various length socket extensions – 3” & 4”
Part Required
Thermostat Assembly – Genuine Land Rover Part #: LR005631
Step 1.
Remove Engine cover by removing (4) 6mm screws in each corner.
View attachment 62201
Step 2.
Remove air filter housing, MAF plug, plastic funnel from throttle body, and radiator fan shroud/cover.
View attachment 62193
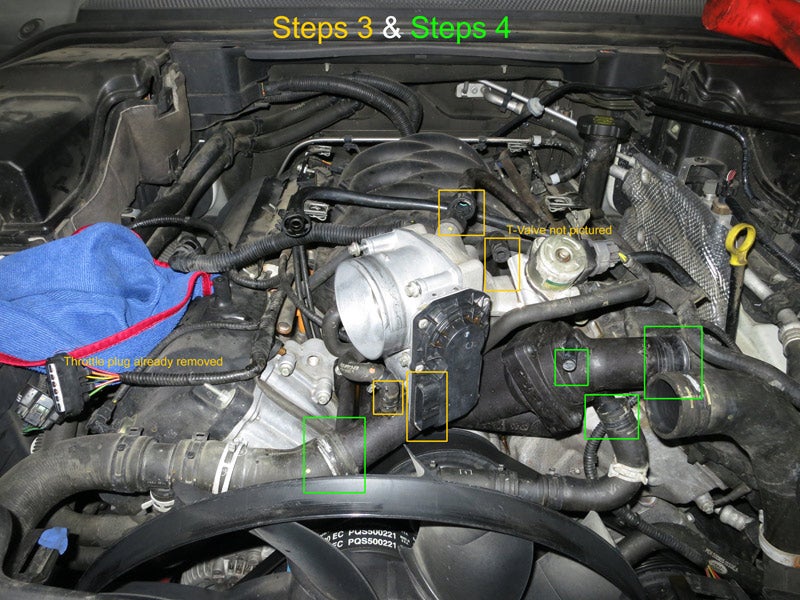
Step 3.
Disconnect the following hoses and cables from the throttle body – not pictured is the “T-Valve” that failed on me but you can find a photo here http://www.rangerovers.net/forum/9-...-range-rover-sport-l320/48031-2-hour-tune-up-4-4-hse-post392335.html#post392335;
Step 4.
Disconnect the following hoses from the thermostat assembly;
![Image]()
Step 5.
Remove the (3) T30 screws holding the thermostat in place – keep in mind when replacing with the new part on the reassembly the new one CAN stay on.
Step 6.
Remove the throttle body – (4) 8mm bolts. BE VERY CAREFUL when separating the throttle body from the manifold. There is a thin metal gasket in between that is extremely fragile. Damaging it will require you to replace it before reassembly.
![Image]()
![Image]()
Step 7.
Unbolt the parts of thermostat assembly and yellow retention clip – this is where you’ll encounter the 2 problem screws
![Image]()
Note:
I performed this install while my cooling system was completely drained. If performing this procedure while coolant is still in the system, you may experience some fluid release when disconnecting some of the hoses. It is recommended if you are refilling, that you check for any leaks with a vacuum seal. Also, if you're performing this repair consider the following thread as a preventive measure in keeping your RRS running smooth; http://www.rangerovers.net/forum/9-range-rover-sport-l320/48031-2-hour-tune-up-4-4-hse.html
Credits:
RoverGuy7
Gooseyloosey
Tools Required
¼” Ratchet – thin profile for confined areas and preferably one with a swivel head or equivalent)
6mm socket – Used for engine cover removal
8mm socket – All bolts encountered
T25 Torx – PCV screws
T30 Torx – thermostat assembly screws
Phillips & Flat head screwdriver
Pliers – for hose removal clips
Various length socket extensions – 3” & 4”
Part Required
Thermostat Assembly – Genuine Land Rover Part #: LR005631
Step 1.
Remove Engine cover by removing (4) 6mm screws in each corner.
View attachment 62201
Step 2.
Remove air filter housing, MAF plug, plastic funnel from throttle body, and radiator fan shroud/cover.
View attachment 62193
Step 3.
Disconnect the following hoses and cables from the throttle body – not pictured is the “T-Valve” that failed on me but you can find a photo here http://www.rangerovers.net/forum/9-...-range-rover-sport-l320/48031-2-hour-tune-up-4-4-hse-post392335.html#post392335;
Step 4.
Disconnect the following hoses from the thermostat assembly;
Step 5.
Remove the (3) T30 screws holding the thermostat in place – keep in mind when replacing with the new part on the reassembly the new one CAN stay on.
Step 6.
Remove the throttle body – (4) 8mm bolts. BE VERY CAREFUL when separating the throttle body from the manifold. There is a thin metal gasket in between that is extremely fragile. Damaging it will require you to replace it before reassembly.


Step 7.
Unbolt the parts of thermostat assembly and yellow retention clip – this is where you’ll encounter the 2 problem screws


