

Since the original thread disappeared a while back from this forum but I saved the pictures, I thought I'd repost the instructions on how I hardwired a Valentine One on my 2006 RRS for future reference. This takes 10-15 minutes.
First, grab the front edge of the overhead console with the tip of your fingers and pull down firmly, the console should come loose and open up without much effort:
![]()
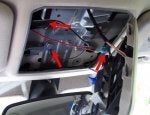
The arrows in the image below show the connections of the hardwiring kit included with the V1 (other radar detectors will likely be wired in similar fashion.) On the right, the red wire draws 12v power from a switched green/white lead in the harness for the overhead lights. The black ground wire is connected to a bolt above the overhead panel. The third arrow indicates the body of the hardwiring harness that powers the detector via RJ11 (modular phone) jack.
![]()
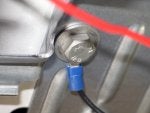
Detail of the hot connection to the overhead lights harness. Make sure you pick the striped green/white wire only, the others are either not 12v or they are unswitched and your radar either won't turn on at all or will stay on all the time... The Valentine includes a handy self-tapping connector in the kit - the blue piece around the green/white wire - which eliminates the need for splicing or cutting and leaves no traces of tampering if you ever need to remove the radar (such as on a leased car): you simply slide the connector around the wire, squeeze it with a pair of pliers to score the insulation and tap into the 12v lead, and finally slide the male faston at the end of the red wire into the female faston on the blue connector.
![]()
To ground the detector (the black wire), slightly loosen one of the bolts above the panel with a 13mm socket, slide the spade clamp at the end of the black wire between washer and overhead metal plate, and tighten the bolt:
![]()
Here is an image of the hardwiring harness body where the radar detector plugs into. I attached it above the overhead console using the provided Velcro tape, there are plenty of nooks and crannies up there. The radar detector is wired to the Main Unit plug via modular phone jack. Note the unused "Accessory" plug, which in the V1 can be used for an optional, remote display mounted elsewhere in the car. As you can barely see in the picture, I bundled up the excess black and red wiring and inline fuse holder from the hardwiring harness with a zip tie, and placed the bundle above the headliner on the side of the overhead panel opening:
![]()
I chose installation of the radar detector just to the left of the rear view mirror. The phone jack and cord easily slide between headliner and windshield, and the "tinted" part behind the rear view mirror makes the wire almost invisible:
![]()
And here is the finished installation from the driver's perspective. After wiring everything up, test to make sure you get power to the detector. Don't forget you need to turn on the ignition AND radar detector first! If you get juice flowing, you are done. Carefully align the two plastic studs in the rear of the overhead console with the cutouts in the headliner, and push the front of the overhead panel up against the roof until it snaps back in place. With this type of installation, the detector will automatically turn on when you open the doors with the remote or start the car, and will turn off about 3-4 minutes after you remove the key from the ignition, or right away if you arm the alarm.
![]()
First, grab the front edge of the overhead console with the tip of your fingers and pull down firmly, the console should come loose and open up without much effort:

The arrows in the image below show the connections of the hardwiring kit included with the V1 (other radar detectors will likely be wired in similar fashion.) On the right, the red wire draws 12v power from a switched green/white lead in the harness for the overhead lights. The black ground wire is connected to a bolt above the overhead panel. The third arrow indicates the body of the hardwiring harness that powers the detector via RJ11 (modular phone) jack.
Detail of the hot connection to the overhead lights harness. Make sure you pick the striped green/white wire only, the others are either not 12v or they are unswitched and your radar either won't turn on at all or will stay on all the time... The Valentine includes a handy self-tapping connector in the kit - the blue piece around the green/white wire - which eliminates the need for splicing or cutting and leaves no traces of tampering if you ever need to remove the radar (such as on a leased car): you simply slide the connector around the wire, squeeze it with a pair of pliers to score the insulation and tap into the 12v lead, and finally slide the male faston at the end of the red wire into the female faston on the blue connector.

To ground the detector (the black wire), slightly loosen one of the bolts above the panel with a 13mm socket, slide the spade clamp at the end of the black wire between washer and overhead metal plate, and tighten the bolt:
Here is an image of the hardwiring harness body where the radar detector plugs into. I attached it above the overhead console using the provided Velcro tape, there are plenty of nooks and crannies up there. The radar detector is wired to the Main Unit plug via modular phone jack. Note the unused "Accessory" plug, which in the V1 can be used for an optional, remote display mounted elsewhere in the car. As you can barely see in the picture, I bundled up the excess black and red wiring and inline fuse holder from the hardwiring harness with a zip tie, and placed the bundle above the headliner on the side of the overhead panel opening:

I chose installation of the radar detector just to the left of the rear view mirror. The phone jack and cord easily slide between headliner and windshield, and the "tinted" part behind the rear view mirror makes the wire almost invisible:
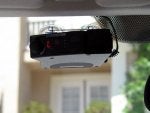
And here is the finished installation from the driver's perspective. After wiring everything up, test to make sure you get power to the detector. Don't forget you need to turn on the ignition AND radar detector first! If you get juice flowing, you are done. Carefully align the two plastic studs in the rear of the overhead console with the cutouts in the headliner, and push the front of the overhead panel up against the roof until it snaps back in place. With this type of installation, the detector will automatically turn on when you open the doors with the remote or start the car, and will turn off about 3-4 minutes after you remove the key from the ignition, or right away if you arm the alarm.

 YMMV, depending on what your local traffic enforcement agencies use.


